Quick Post-Party Yoga Routine for Your Feet & Back
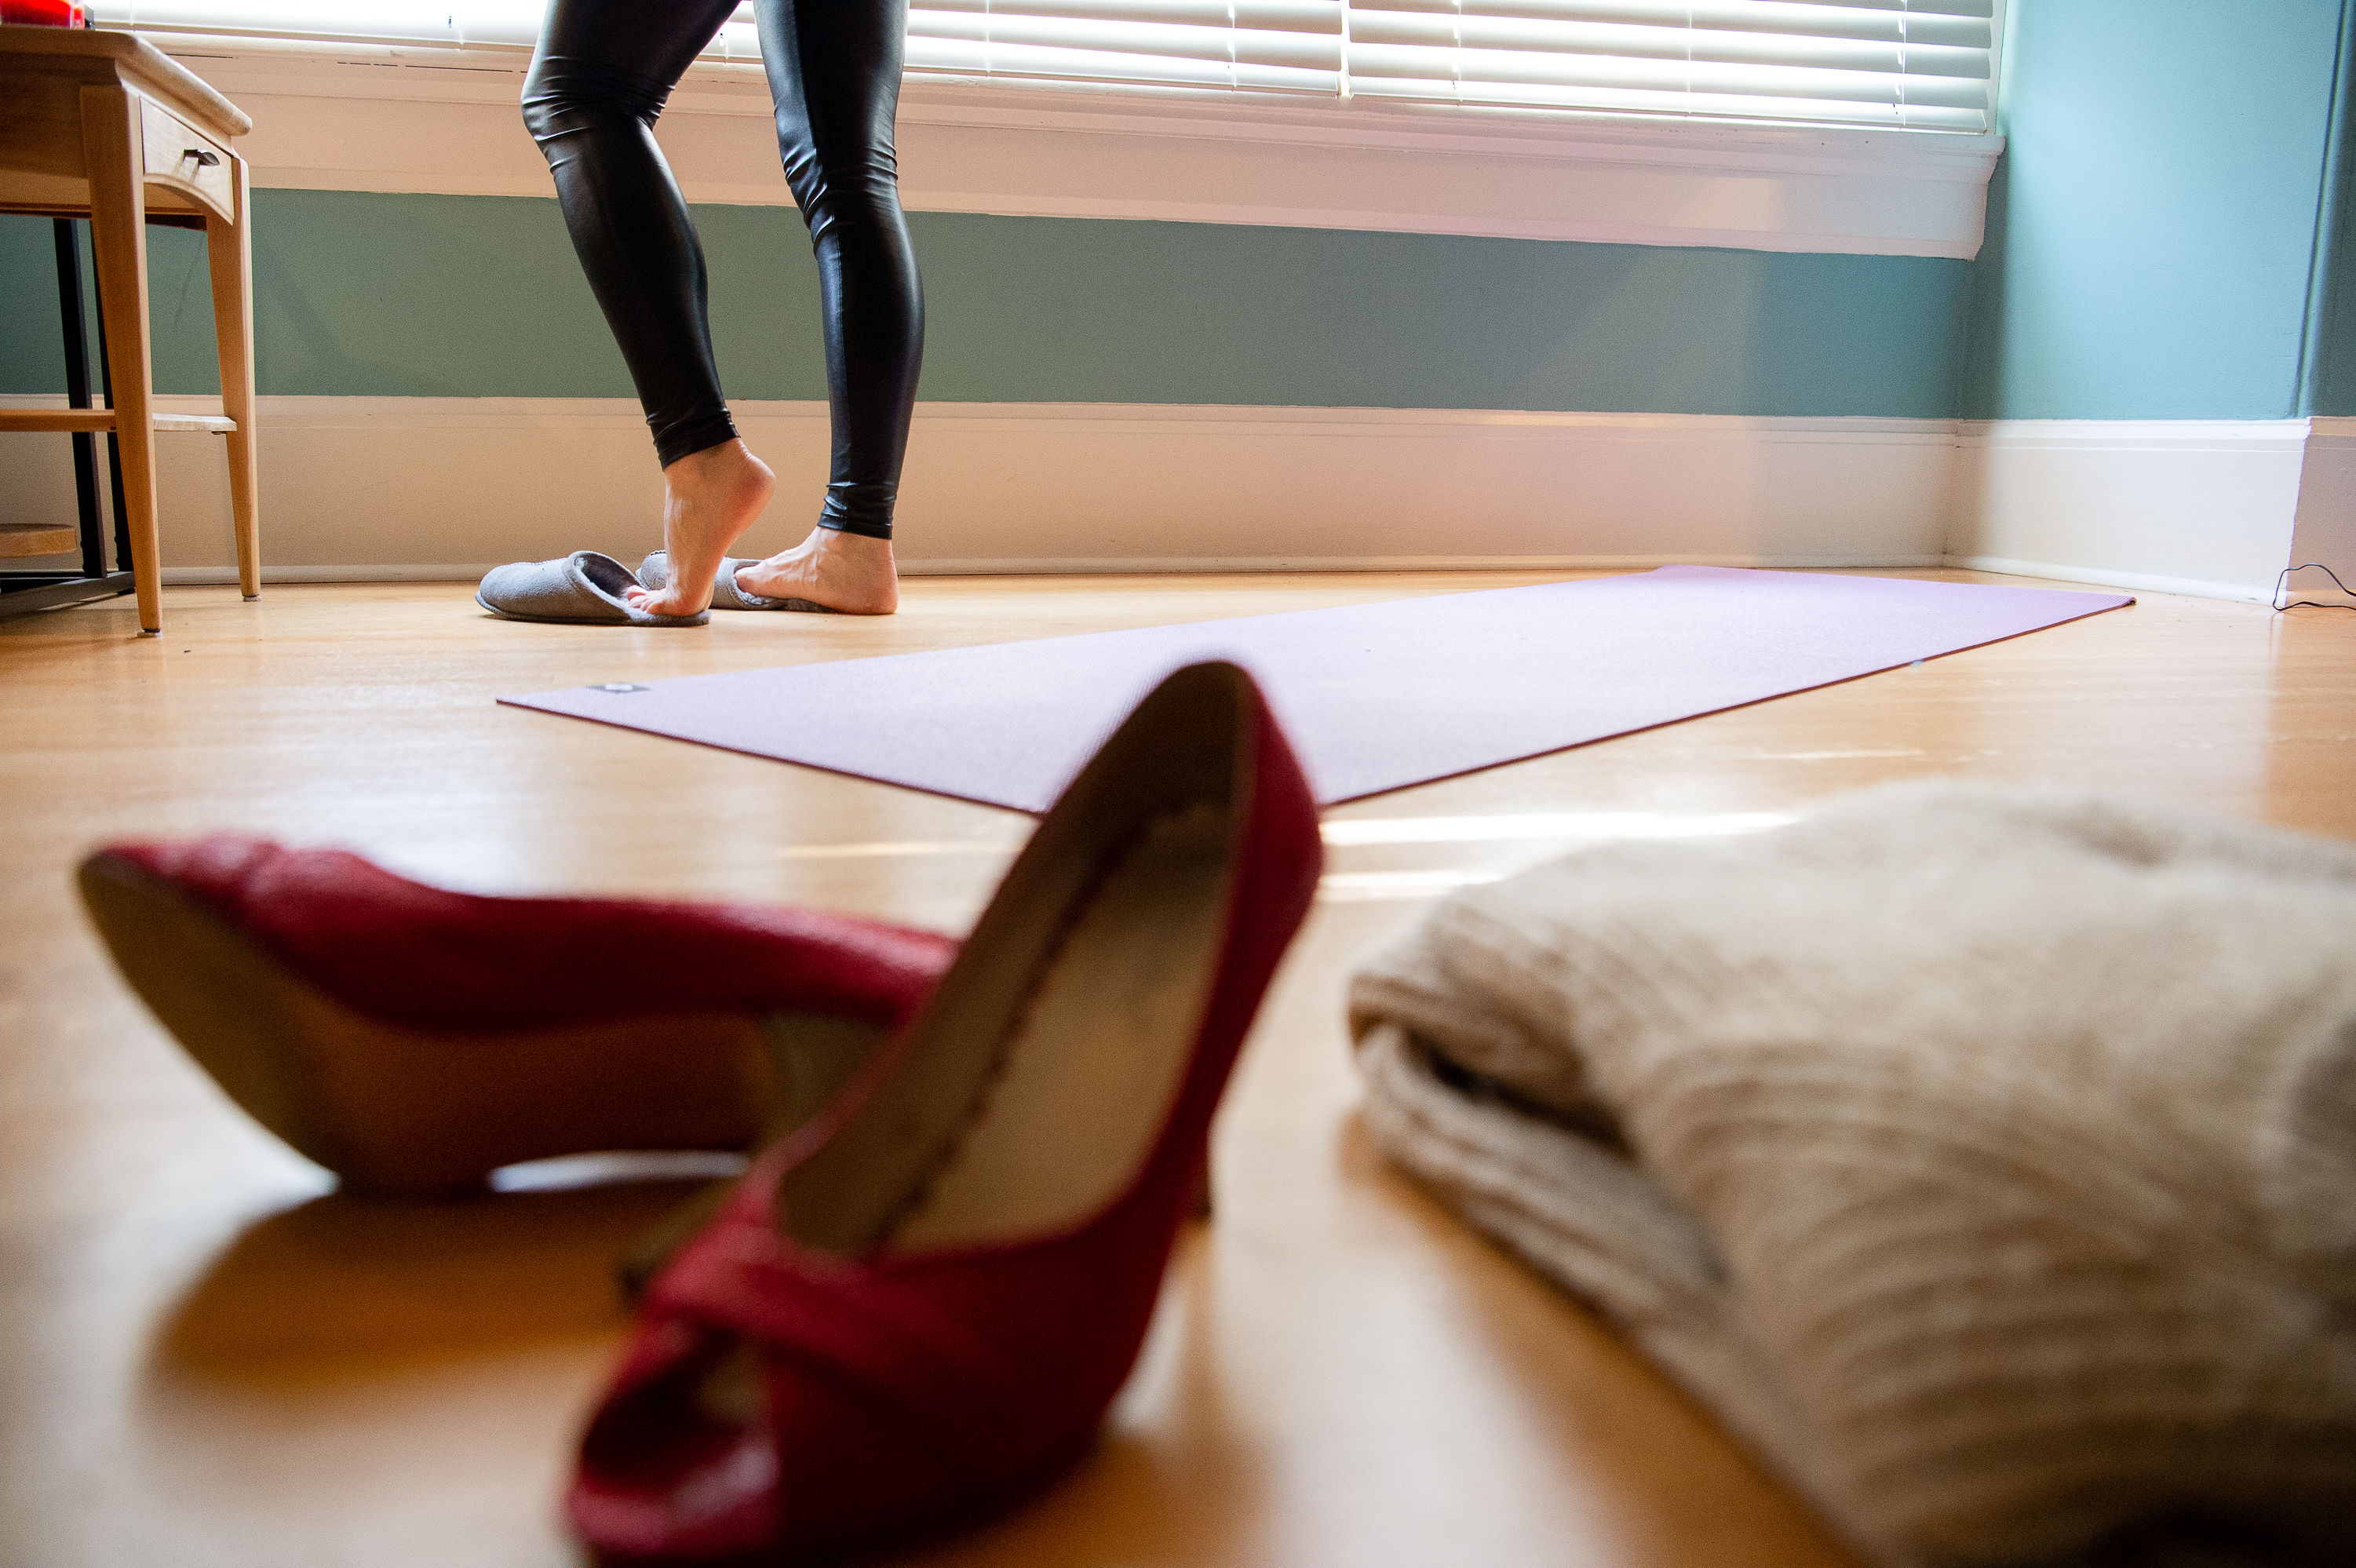
It’s holiday party season and you are going to look fab in your outfit and party shoes. But your feet are going to hate you. Why? High heels, baby, high heels. There’s a reason your feet sigh with relief when you kick your shoes off. But I’ve got you with a quick, effective post-party yoga stretch routine for all levels to help decompress you from head to toe — and counteract the negative effects of those skyscrapers heels.*
(And gents, you aren’t necessarily wearing heels, but your dress shoes are also making your feet cry. Just saying…)
A full sequence of the below takes about 10-15 minutes, depending on how long you want to hold a posture. So kick off those heels and do some damage control. (It’s also a great after work routine.) Happy stretching!
*Though all these stretches are gentle, be sure to check in with your doctor(s) before trying any new physical activities.

Yoga stretches for your feet and back
Have you ever noticed that when your feet hurt, other parts of your body are affected in kind? An example of this is when we wear high heels when there is a tendency to slightly stick our bums out. It’s a counterbalance thing, but it compresses the lower back. So not only are your feet wondering what you put them through while you were drinking spiked eggnog cocktails but so is your back.
Before we get into the yoga stretches, here’s something to keep in mind when you’re standing around chatting or people-watching at a party: when you’re chatting with someone, stand evenly on both feet and pull your tailbone down (slight tuck). This will engage your pelvic floor and pull your navel in. You’ll lengthen both your back and front body, look at least an inch taller, and a quick rollback of the shoulders will let you wear that sparkly dress like you mean it!
Now let’s get stretching.
Dead Bug

I do this when I come home from work, after an event, being out walking with The Brit, etc. It’s my favourite.
Benefits: Kickstarts circulation; can decompress lower back and shoulders.
Method: Lie down on your mat and reach your hands and feet up in the air. Keep a slight bend in the elbows and knees to allow the shoulders and lower back to fully settle on the mat. Wiggle the fingers and the toes; roll the wrists and ankles. With every exhale, invite your head, shoulders and lower back to settle a little bit more onto the mat.
Option to transition into Happy Baby (Ananda Balasana). An even more supported version of this is legs up the wall.
Supine Twist (Supta Matsyendrasana)

My spine really loves a twist. I could stay in this pose all day. (Just set me a timer so I switch sides!)
Benefits: Stretches the glutes, chest, and obliques. Can also improve spinal mobility and aid digestion.
Method:
- Lie down on your back with arms out in a ‘T’ shape or in cactus/goal-post arms.
- Bend your knees and put the soles of your feet on the floor, or bring your knees up to 90 degrees.
- Slightly lift your hips off the floor and shift them approximately an inch to your left. This is important to do as it sets your hips up to stack one on top of the other when you move into the twist without hurting your spine.
- Tilt your knees over to the floor on your right. Your hips will now be stacked.
- If your knees don’t touch the floor, support them with a cushion.
- If it’s available for your neck, turn your head to the left, bringing your gaze over your shoulder to your fingertips. Skip this if it doesn’t feel good in your neck.
- Inhale to lengthen and create space in your spine, exhale to come a little further into the twist. Hold for 5-10 breaths before rolling onto your back and shifting the hips back to centre.
- Repeat steps 1-7 on the other side.
Yogi Tip: It is more important for your shoulders to be even on the mat than for your knees to touch the floor. Prioritize keeping the shoulders down and let the knees float up a bit. If your knees are far from the floor, you may want to place a cushion under them for support.
Cat-Cow (Chakravakasana)

Cat-Cow is really wonderful for your spine. I always teach this at the beginning of a class and it is a mainstay in my own practice.
Benefits: Spine health and mobility. Stretches the front and back body.
Method:
- Come on to your hands and knees. Make sure your shoulders are stacked on top wrists, and hips stacked on top of your knees.
- As you inhale, tilt your tailbone up to the ceiling and arch your back, bringing your stomach towards your mat and your gaze gently up to the ceiling.
- As you exhale, tilt the tailbone down as you pull your belly button into your spine; push down into the mat with your hands and knees with your gaze to your belly button.
- Slowly repeat 10-12 times.
Open Twist (Anjaneyasana) with Shoulder Stretch

Also a nice prenatal twist option (no, I’m not pregnant, just providing options!), Open Twist is a nice way to open up the chest. Threading the needle will open your upper back and stretch out your shoulder.
Benefits: Spine health and mobility. Stretches the abdominals and back. Upper back and shoulder stretch via threading the needle.
Method: From your Cat-Cow, plant your right hand on the mat with your index knuckle firmly grounded. Push down on the hand to create length in the right arm as you open to the left side of the room with your left arm in the air. Hold for a few breaths. Bring the left hand down to come under your right armpit to thread the needle. If available, bring your left cheek down to the mat. Hold for a few breaths and switch sides.
Downward Dog (Adho mukha svanasana)

Often referred to as a resting pose, Downward Dog is the ultimate calf and ankle stretch.
Benefits: Stretches the calves, hamstrings, and ankles. Strengthens and lengthens arm muscles. Blood flow back to the heart and head, and a nice way to decompress your neck.
Method: In your table-top position, move your hands forward a few inches, spread the fingers wide, with index knuckle firmly planted; tucking the toes. Inhale deeply, and use your exhale and abdominals to push back to make and inverted ‘V’ shape. Keep a bend in the knees to support the lower back, belly button in and up, and shoulders away from your ears. Walk the dog, alternating your heels up and down. Hold for 5-10 breaths.
If you’d like to incorporate one-legged dog with a hip flexor stretch on each side, go for it.
Top Tip: Get a head start in stretching out your ankles and calf muscles by carrying a pair of flats in your handbag. Your legs and feet will LOVE you when you put them on I have a cheap no-name brand pair, but I have my eye on these adorable (and super portable) ballerina flats from Tieks.
Foot and Ankle Opener

This probably sounds and looks weird, but it feels AMAZING.
Benefits: Aids in ankle mobility and stretches the toes (prep for Thunderbolt!) Stretches the glutes.
Method: Keeping your left leg straight, cradle your right leg. If your glutes are tight, bend your left leg and prop your right ankle. Intertwine your fingers between your toes and gently flex and point the foot while gently rotating the ankle – continue for five breaths. Switch legs and repeat.
Thunderbolt Pose (Vajrasana)
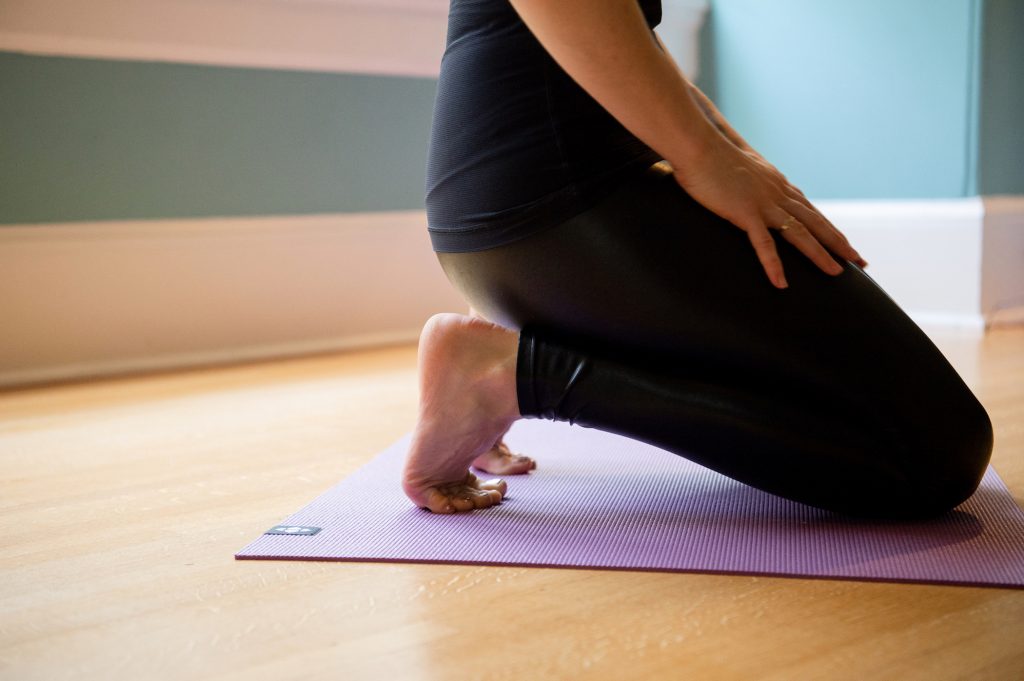
High heels are the best for an outfit, but the worst for your feet! Bunions, plantar fasciitis, shortened Achilles, etc. (From prolonged wear.) Ugh. But since they aren’t going away any time soon, this is THE foot stretch to help counteract the side effects. But you will feel it — please don’t hate me! There’s a reason it’s called Thunderbolt…
Benefits: Opens up the toes, ankles, and calf muscles.
Method:
- Come up onto your knees and reach behind to spread and tuck your toes — even the baby toes!
- Sit back onto your heels with a tall spine and hands on your thighs. Stay here for one minute. (Again, please don’t hate me!) BREATHE.
- If the sensation in your feet gets to be too much, come up onto the knees for two breaths and then sit back down on the heels.
- After a minute, come forward into tabletop and untuck the toes. Briskly tap the tops of the feet on your mat. Repeat if desired.
- Pop into a forward fold or seated forward fold for a counter-stretch for the back of the legs.
Seated Forward Fold (Paschimottanasana)
A seated forward fold is a nice way to decompress the spine, backs of the keens, and the mind (especially after Thunderbolt!). If you want
Benefits: Stretches and opens the hamstrings and hips. Helps to decompress the back of the neck and the spine.
Method:
- Sit on your mat. If desired, and for more comfort, elevate the hips by sitting on a cushion or block. You can sit with your legs with in front of you or in a cross-legged Easy Pose.
- If you have your legs straight, keep a slight bend in the knees to support the lower back. Hinge from the hips to bring the upper body forward with a flat back.
- Once at your edge (you will know), gently round your upper back and relax your head forward with your hands in front of you for support.
- Hold for 10-20 breaths and gently roll up through your spine to bring yourself back to seated.
And then… it’s time for slippers and a glass of water before bed. I’ve become my mama, and I am down with it. Happy Holidays!
This post was created in partnership with Orb Clothing and Orb Athletic, but opinions are always my own. Photos are by the lovely an talented Jana Josue-McLaren.
“You put high heels on and you change.”
Manolo Blahnik
Shop the Post
I bought my red peep-toe heels at a night market in Taipei, but you can find similar ones here:


You May Also Like

Happy 2013! – Goals for the year
